The goal of this post is just to give you an overview of how we can develop a simple SpringMVC application using Eclipse.
I am using SpringMVC 4, Eclipse Kepler, JDK 1.7 and ApacheTomcat7 to develop the application.
You can download the SpringMVC required JAR files at below link: SpringMVC jar .
We need to have common-logging jar. You can download it from: Common-logging jar
Please download Apache Tomcat server at :Apache Tomcat
To start the application, we first need to add ApacheTocat server to Eclipse. Please follow below steps to configure ApacheTocat server to Eclipse.
window->showView->server->
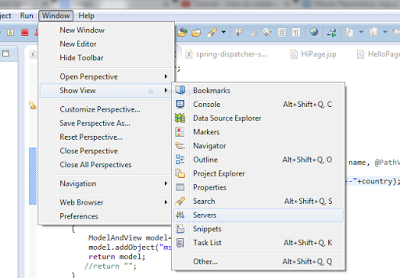
Once you click on server, you will get server view at the console stating that "No servers are available". Click this link to create a new server. Please click on this link and configure the server as below:


Click on next and select Apache Installation Directory and click Finish. We are done with Apache Tomcat set up. Now we are creating a Dynamic project in eclipse and add all the required jars files. We are done the setup for our SpringMVC application.


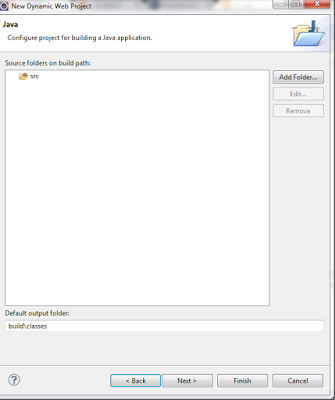

Please make sure you should check generate web.xml deployment descriptor or else you will not get web.xml file in your project structure. Click on Finish.
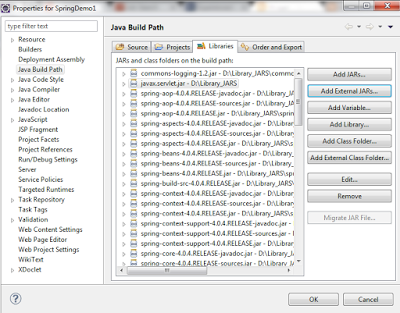
Now we will have to add all the required Spring MVC and common-login jars files into class path. Please follow below steps to add the jars.
right click on your project->build path->configure build path->add external jar
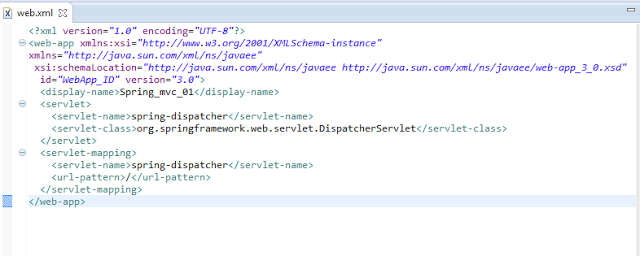
Now we need to write web.xml file. Please keep in mind if user clicks any link, the request first comes to DispatcherServlet or front controller which is configured in web.xml and also we have to provide the mapping URL. My web.xml looks like:
Once DispatcherServlet receives the request, it will send the request to HandlerMapping class. So we are creating one spring-dispatcher-servlet.xml under WEB-INF.

Now we have to write our controller class so that when request come to Dispatcher Servlet or Front Controller, It should identify the correct method of the controller class. Our Controller class looks like:
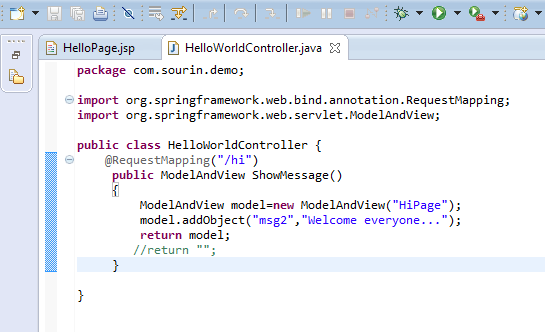
If requested URL looks like : http://localhost:8080/Spring_mvc_01/hi then it comes to Controller class and check if there is any request mapping is present following "/hi". If it finds, then the corresponding method would get invoked. We create a Model object here and return it to Front controller. Front Controller will check with View Resolver and run HiPage.jsp file. So if we run our application, it looks like:

That is all guys. I have made this blog as simple as I could and also show you the SpringMVC application step by step. I would love to see your feedback. Thank you!!.
You may also like:
How to build webservices using JAX-RX and Maven?
I am using SpringMVC 4, Eclipse Kepler, JDK 1.7 and ApacheTomcat7 to develop the application.
You can download the SpringMVC required JAR files at below link: SpringMVC jar .
We need to have common-logging jar. You can download it from: Common-logging jar
Please download Apache Tomcat server at :Apache Tomcat
To start the application, we first need to add ApacheTocat server to Eclipse. Please follow below steps to configure ApacheTocat server to Eclipse.
window->showView->server->

Once you click on server, you will get server view at the console stating that "No servers are available". Click this link to create a new server. Please click on this link and configure the server as below:


Click on next and select Apache Installation Directory and click Finish. We are done with Apache Tomcat set up. Now we are creating a Dynamic project in eclipse and add all the required jars files. We are done the setup for our SpringMVC application.


Please make sure you should check generate web.xml deployment descriptor or else you will not get web.xml file in your project structure. Click on Finish.
Now we will have to add all the required Spring MVC and common-login jars files into class path. Please follow below steps to add the jars.
right click on your project->build path->configure build path->add external jar

Now we need to write web.xml file. Please keep in mind if user clicks any link, the request first comes to DispatcherServlet or front controller which is configured in web.xml and also we have to provide the mapping URL. My web.xml looks like:

Once DispatcherServlet receives the request, it will send the request to HandlerMapping class. So we are creating one spring-dispatcher-servlet.xml under WEB-INF.

Now we have to write our controller class so that when request come to Dispatcher Servlet or Front Controller, It should identify the correct method of the controller class. Our Controller class looks like:

If requested URL looks like : http://localhost:8080/Spring_mvc_01/hi then it comes to Controller class and check if there is any request mapping is present following "/hi". If it finds, then the corresponding method would get invoked. We create a Model object here and return it to Front controller. Front Controller will check with View Resolver and run HiPage.jsp file. So if we run our application, it looks like:

That is all guys. I have made this blog as simple as I could and also show you the SpringMVC application step by step. I would love to see your feedback. Thank you!!.
You may also like:
How to build webservices using JAX-RX and Maven?
I made this blog as simple as I can. Hope this will help you guys.
ReplyDeleteIt will definately give clear and basic idea about how we can start writing codes in JAVA using Basic Spring MVC architecture, as well as how to setup server all these basic ideas.
ReplyDeleteNice approach....
Its really very helpful in understanding the basic spring mvc architecture as well as how to configure it. Nice work really appreciated
ReplyDeletegood work...
ReplyDeleteGood work man... looking forward for more such posts
ReplyDeleteVery nicely articulated...good work...keep it up :)
ReplyDeleteVery nicely articulated...good work...keep it up :)
ReplyDeleteThis is really useful link..helpful for the beginners to understand the basic approach :)
ReplyDeleteThis is really useful link..helpful for the beginners to understand the basic approach :)
ReplyDeleteThis is really useful link..helpful for the beginners to understand the basic approach :)
ReplyDeleteAwesome work! Hope to see many more such useful posts from u in future too! Good luck :)
ReplyDeleteThis comment has been removed by a blog administrator.
ReplyDeleteAwesome work! Hope to see many more such useful posts from u in future too! Good luck :)
ReplyDeleteThank you everyone :)
ReplyDeleteGreat work bro. Keep it up :)
ReplyDeleteVery useful blog for beginners. Good job Sourin :)
ReplyDeleteVery good post.. really helps me in understanding... Thanks! Keep sharing such articles...
ReplyDeleteCarry on bro..looking forward for d full tutorial
ReplyDeleteAwesome article..Keep it up!!!
ReplyDelete